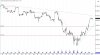
I love how you outline that tiny little range before the open, complete with an equal excursion to test going up and down (outlined by "A" and "B"). Then of course the hinge and the apex which launched the move.
That range for me didn't stand out because I made the fatal mistake of not keeping in mind that price is continuous. With the actual "open" being slightly above this tiny range, it clouded my ability to see this. If in fact I hadn't marked where my open was, then seeing this might have been easier.
But my gosh... does this picture ever tell a thousand words! (at least to the handful of people who know how to read it!
 )
)
")
")
 .
.