Ok.. lets continue.
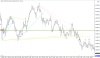
So after W, price was going up solidly until we hit X at which point it turned down. On the 5 minute, this certainly started to look like a hinge so I drew it in with these yellow lines.
Y - I also had an initial DL drawn in from U and the higher low, and price bounces off Y quite nicely here. It goes out the top of the hinge.
To play this, I can use the fact that after my hinge was drawn in, price only made it to the midpoint, it didn't even hit the lower line, so I shouldn't be surprised that it went out the top. I'm not going to work on entries just yet, but if I wanted to carry over the idea of having an entire bar above some trend line like ND shows in her BOPB setup, then where the green arrow is marked would be the trade.
Z - We have practically a triple top here at 4014. If I consider this down move after the open to be 4036 to 3992, then 4014 is exactly the 50% level, and one we cannot cross. After we turn down, I can use this point for some possible supply lines.
We break the DL quite strongly, so perhaps this up move really is over.
a - Fast forward to here. Because the 3998 level was already breached, I don't think its going to provide juicy trades anymore, more likely it will be the the lowest low at 92 now.
Anyway, I notice that if instead of just using that yellow line to mark in my hinge, I can use this in fact as another trend line. I wasn't accustomed to using these lines because for a great length of time, price had moved away from it, but thanks to ND, I am now paying special attention to them. I think that often I was shorting after seeing big moves down, only to be caught by one of these higher time frame trend lines. Had I been aware of them, I might have known to be thinking of going long rather than short.
Here price reverses just a tick above it, and this would give me good reason to go long above this bar.
At the same time, I do have some SL's from Z that I drew in so I can watch these as well. The long ultimately fails, and really, going long after such a strong down trend is silly, but perhaps knowing this, I could just use this as a place to get a few points if I was so inclined, expecting the bounce for at least a few points.
b - When we break below, its just congestion for 4 minutes, but I can use this low to fan the line ever so slightly.
We keep trying to go higher, and it appears we are building a level of support, but there is still nothing that really screams to go long.
c - This dashed SL comes from connecting the high at the open with Z, so its another major trend line. I could almost say that one bar does close above it, but a trade above this bar would never trigger and back down we come. (trade isn't marked in, but to be faithful to my system, with price coming up to a major trend line, if it opened and closed above, I would have to go long)
d - It gets really quite messy in here, and honestly, not the best place to be looking for a trade, but here we do break below the trend line again but bounce back up.
e - This is where it gets good though. This bar above the down arrow is fully below the trend line, so if a sell stop is placed here and price comes down to trigger it, we might finally be in a good down move.
It of course does fill, but there is more sideways action.
f & g - With price coming up to here, this a good reason to be careful above moving stops to BE. Both of these highs are roughly exactly where the entry was, so if hit, you haven't lost any money, but you almost miss the additional 20 points that price ends up dropping.
SUMMARY
Easy to analyze on a chart like this I guess, but I am making sure to be specific about what I need to see.
")